
Windows 10 has been greatly favored by most gamers as it’s the best platform for gaming and streaming, in general. However, the OS is not readily made to perform and cope with the extreme demands of online gaming and most often, newer games. It might slow down or perform poorly due to the effect of other parts of your PC like graphics card, CPU, memory, hard disk, network, and others.
We, as gamers, must make sure that your Windows 10 is fully optimized to run smoothly and provide us with the best gaming experience.
9 efficient methods to tweak your Windows 10 up for a smoother gaming experience
1. Using the Windows 10 Game Mode
A good point to start at for optimizing Windows 10 is on activating its built-in Game Mode. This tool is integrated with the most recent releases of the Windows specifically for improving users’ gaming experience.
To set your Windows 10 to Game Mode, press Windows key + I then type in “game mode” on the search box.
Click on Game Mode settings or Turn on Game Mode.

You’ll be prompted with the Gaming screen where you can click Game Mode. Turn the Game Mode On and you’re good to go.
Some of the key functions of the Game Mode option is that it manages resource to achieve the optimum frame rate and suspends Windows Update.
2. Disabling Nagle’s Algorithm
Primarily, Nagle’s Algorithm bundles data packets that affect your internet connection. It can be useful for normal web browsing but can cause delays and latency when you’re gaming.
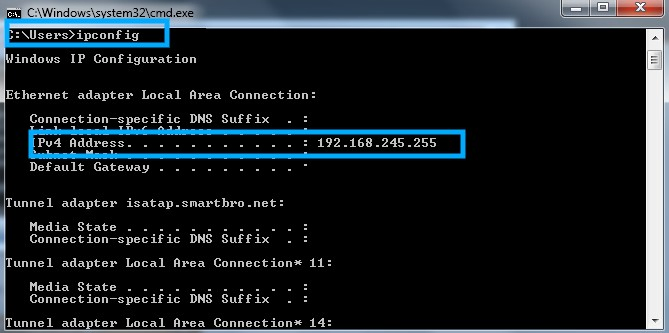
To disable the Nagle’s Algorithm, start by checking your IP address:
Press Windows key + X, choose the Windows PowerShell and Enter ipconfig or
on the search box at the bottom of the screen, type cmd, select Command Prompt from the search results and type in ipconfig/all on the black screen.
Look for “IPv4 address” to identify your PC’s IP address.
Take note of this then edit the Windows Registry:
Click Start and type regedit
Select Registry Editor and copy then paste this path in the address bar:
HKEY_LOCAL_MACHINE\SYSTEM\CurrentControlSet\Services\Tcpip\Parameters\Interfaces
This path will lead you to a menu mostly with entries (similar to folders) labeled with numbers and letters. Match your IP address with the one listed against DhcpIPAddress in these entries.
You have to create values by right-clicking on that folder and select New>DWORD (32-bit) Value.
Create two values: TcpAckFrequency and TCPNoDelay
Once they are created, double-click on each and set parameters to 1.
Once done, you have successfully disabled Nagle’s Algorithm.
3. Using Faster DNS
Online games, especially multi-player ones can be highly affected by internet speed. The latency in the network connection can sabotage your momentum in the game.
To avoid a slowdown in network traffic, it’s an option to call your ISP and pay an extra to upgrade your internet speed. But this can be costly.
For a cheaper and even faster resolution, you can simply change your DNS and switch to faster ones.
To change your DNS, press Windows + I to open Settings
Find Network and Internet > Change Adapter Settings.
Right-click on your wireless network and select Properties.
Highlight Internet Protocol Version 4 and make a note of the two DNS entries for future reference.
Replace them with a faster DNS server address of your preference.
Click OK, then close it and restart your default browser
We have provided a more detailed guide on how to change your DNS as well as some of the best DNS Servers of 2020 that you might want to consider.
4. Disabling Auto Updates and Windows Notifications
Once it detects a new version, Windows can automatically update your PC’s OS and schedule a restart.
If you have not configured the setting for this, the update might catch you by surprise even while gaming. Also, you will receive several reminders whenever there is an update that can be installed.
You will need to keep your Windows up to date, but we know that no one wants a sudden update and restart mid-game or be bombarded with notifications. You can actually delay the update, schedule the restart at a later time when you are no longer using your PC, and disable Windows notification so you can play online games smoothly.
Here’s how:
Open Settings with Windows key + I
Click Update and Security > Windows Update
Look for Advanced options and click Registry Editor
Disable Restart this device as soon as possible when a restart is required to install an update.
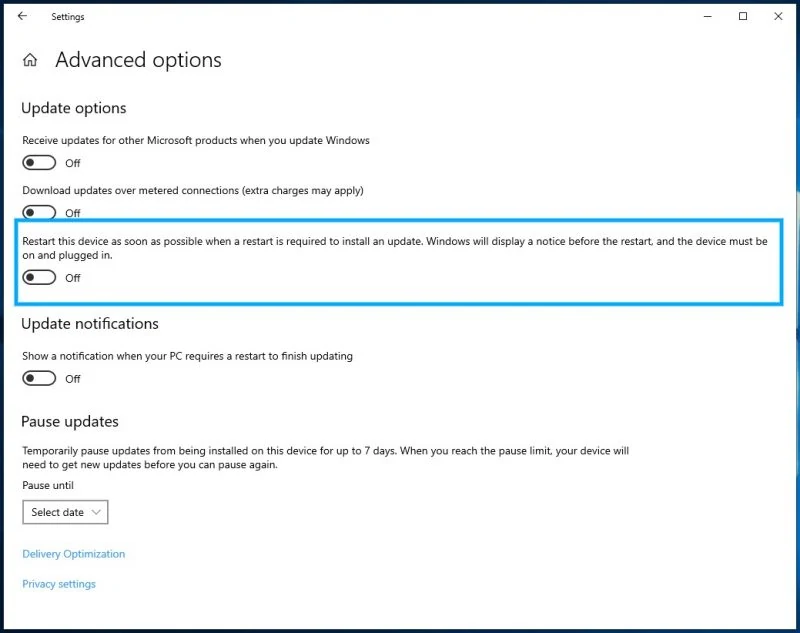
You can turn on Show a notification under Update Notifications to receive warnings when the system is going to restart following an update.
Set up the Pause updates option. You can delay the installation of updates for up to 35 days
You can also disable notifications:
From the Settings, click System > Focus Assist
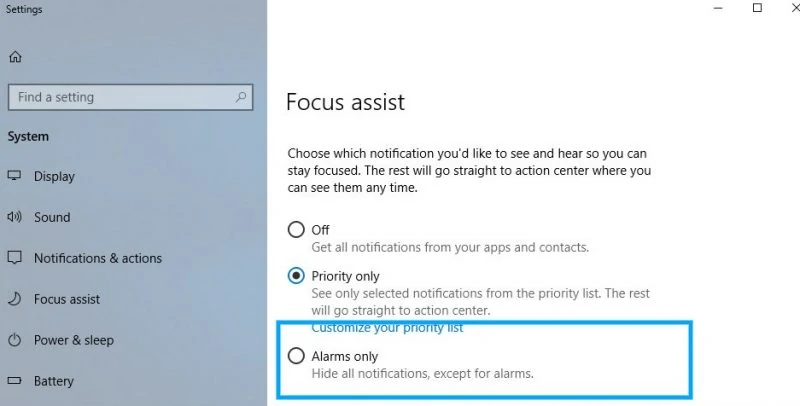
Select Alarms Only to hide all other notifications and close the Settings screen.
Or, to still receive update notifications and warnings, you can choose to turn on the Automatic Rule for turning on Focus Assist and disabling notifications only while you’re in-game.

5. Updating your PC Drivers
It might be best to disable Windows auto-updates and notifications to keep your PC running smoothly while in-game. However, part of the optimization is keeping the drivers up to date as the GPU (Graphics Processing Unit) requires the latest drivers.
On the search bar at the bottom part of the screen, type control panel then go to Hardware and Sound >Device Manager
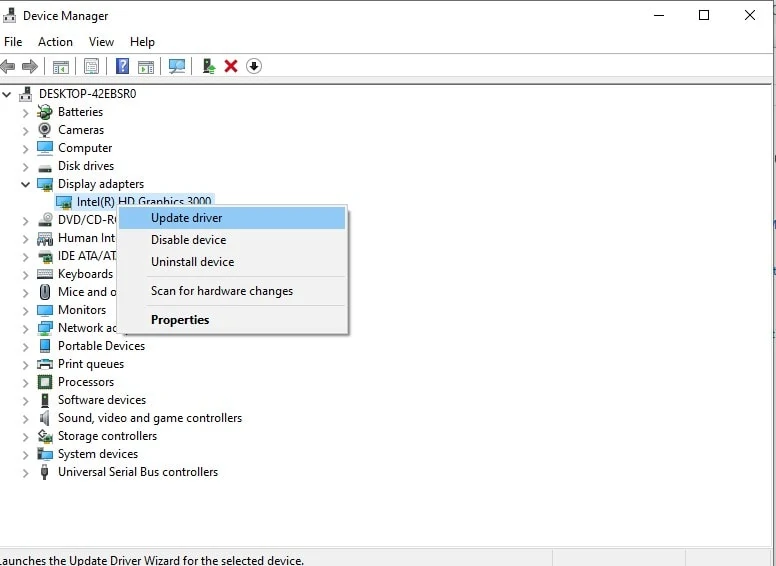
From there, choose a drive you need to update, right-click on it then choose Update Driver.
You can also go to the manufacturer’s website to check for updates. Evidently, one of the most important drivers when gaming is the GPU driver. If you have an Nvidia card, you can get the latest Nvidia driver or download GeForce Experience and let the manager handle everything for you. Alternatively, if you have an AMD video card, you can get the latest AMD video driver or download AMD Adrenalin to let the official manager handle your GPU needs.
6. Disable Steam Updates
If you’re buying and installing games via Steam, you might have also noticed its update feature which can be annoying at times. The automatic updates can actually take up memory and affect your network connectivity as it runs updates in the background.
To disable Steam updates
Launch the Steam client, open Steam > Settings > Downloads and untick Allow downloads during gameplay.

You can also disable update installations for unused games by opening the Steam Library. You’ll see the games that you use the least. From there, right-click a game and select Properties then Automatic Update. Change Always keep this game up to date to Only update this game when I launch it.
7. Tweaking Visual Effects Settings and Mouse setting
What good is an online game without good visual effects, right? However, your Graphical User Interface (GUI) can also highly affect your PC’s performance if not optimized.
Give it a quick fix to give the best visuals while it does not interfere with your PC’s performance:
Open Settings with Windows key + I
Type performance and select Adjust the appearance and performance of Windows.
In the settings box, select Adjust for best performance
Click Apply then on the the Advanced tab, ensure that Adjust the best performance of is set to Programs.
Apply configurations again, then click OK to confirm.
8. Other Settings to Configure
Some parts of your PC might appear small but they still take part on how your OS performs, especially when in game.
First, Press Windows + I to open Settings.
Look for these other PC settings that you can tweak to fully optimize your Windows 10:
Mouse Setting
Disabling the pointer precision (AKA mouse acceleration) can help on optimizing your Os and improve your Pc’s performance.
From the Settings, Click Devices > Mouse
View the Pointer Options tab and uncheck the Enhance pointer precision.
Click Apply then OK to exit or you can also adjust the pointer speed as well before saving the setting.
Set Active Hours
From Settings, go to Update & Security then click on Change Active Hours
Input the hours when you mostly use your PC for gaming and leave a 6-hour interval. This gives your PC a window time to restart itself for better performance.
If you are a really avid gamer who does not sleep much or has a varying game and sleeping schedule, then this option might not be that suitable for you. But still don’t forget to restart your PC from time to time.
Using Max Power Plan
Opinions on how setting up the power options can boost your PC’s performance vary per gamer. Some might have noticed improvements while others barely experienced any changes.
You can still try this though and be the judge:
On Settings’s search bar, type power and click > Power & sleep settings > Additional power settings or
On the search bar at the bottom of your screen, type control panel then click on Hardware and Sound > Power Options.
Select the high-performance option.
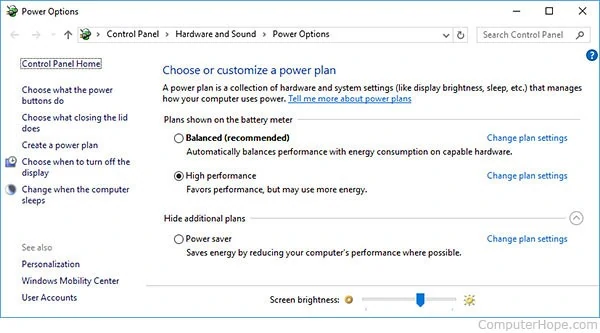
If none is available, you can use the Create a power plan option to configure a power plan of your own.
Just beware that the performance improvement for this option will rely on higher energy consumption and temperature levels. This might not be suitable for laptops; hence it can be best to try it on a desktop PC.
9. Some Add-ons
There are also additional options that you can consider to boost your PC’s performance and optimize Windows 10 for gaming like updating an API tool and upgrading your PC’s HDD to SDD.
Install DirectX 12
DirectX12 is the latest version of Microsoft’s popular API tool which is set to automatically optimize many gaming settings for Windows 10. For many serious gamers, it is really a must-have.
It supports multiple GPU and CPU cores, powers better frame rates, lower power consumption and can also enhance graphical effects.
To open the DirectX Diagnostic Tool, Open Windows PowerShell, type dxdiag and press Enter.
On the Diagnostics Tool, see if you have the latest DirectX. If not, go to Settings (Windows key + I) and select Update and security.
Find Windows Update > Check for updates and wait for the installation of the update to be completed.
Once done, you’re good to go.
Use an SSD
Switching your PC’s HDD to SSD will not magically boost your PC’s performance but it can significantly improve the loading time.
While SSDs can be quite pricey and loading time might not be that big of a deal to spend on, it also a great help for speeding up your PC and optimizing it for gaming.


")


