
Balena Etcher is a highly efficient solution that’s changing the game by streamlining the process of burning OS images onto our trusty portable media.
Let’s see what’s exactly Balena Etcher and how can we use it reliably.
What is Balena Etcher?
Balena Etcher, a tool I’ve come to rely on for my tech projects, serves as an invaluable utility developed by Balena—a name well-known in the developer community. This software transforms your image files into live SD cards and USB drives with just a few clicks.
It’s not just a program; it’s an open-source app that caters to anyone needing to flash operating system images with reliability and ease. Whether setting up a Raspberry Pi or installing Linux on an old laptop, Balena Etcher stands ready as your go-to ally for creating bootable media with minimal fuss.
A free and open-source utility for writing image files onto storage media
I use BalenaEtcher when I need a reliable tool to create bootable USB flash drives or load new operating systems onto SD cards. It’s free, so I don’t have to spend a dime on expensive software for my image writing tasks. Of course, we have some alternatives like Rufus, but BalenaEtcher has some strengths that we’ll touch on later.
With its open-source nature, it assures me that a community of developers is continuously improving it. Whether it’s prepping for a Linux installation or setting up various machines with different OS images, this program meets my needs without any cost.
The beauty of this cross-platform utility lies in its support across Windows, macOS, and Linux—it’s the kind of versatility I need in my toolkit to work efficiently. The software simplifies what used to be complex processes into straightforward actions, letting me write .iso files or even zipped folders directly to removable external media with just a few clicks.
Its intuitive interface makes the task at hand almost effortless while ensuring that the flashing process is safe and error-free every single time.
Features of Balena Etcher
Diving into its Balena Etcher’s features, you’ll experience a user-friendly interface that simplifies the process of creating bootable USB flash drives and SD cards. Its capability to write various image formats like .iso, .img, and even directly from zipped folders transforms complex flashing tasks into a seamless point-and-click operation.
The beauty lies in its cross-platform nature; whether you’re on Windows, macOS, or Linux, Etcher’s consistent performance paves the way for hassle-free OS installations. This powerhouse tool strikes an ideal balance between simplicity for beginners and efficiency for seasoned tech enthusiasts—you no longer have to wrestle with command-line instructions or fear corrupting your precious storage media.
Can write .iso, .img, and zipped folders onto SD cards and USB drives
I have to say, the ability of Balena Etcher to write .iso and .img files, along with zipped folders onto SD cards and USB drives is nothing short of impressive. This feature makes it an invaluable tool for tech writers like myself who often need to create bootable media for testing different operating systems or software applications.
It’s just a matter of selecting the right file, choosing the target SD card or USB drive, and letting Balena Etcher do its thing.
Cross-platform compatibility
As someone who loves tinkering with different operating systems, I appreciate tools that work across Windows, macOS, and Linux. Balena Etcher shines in this aspect as a truly cross-platform tool.
Whether you’re on your sleek MacBook or an old-school PC; you can use this versatile application to create bootable USB flash drives and SD cards without worrying about compatibility issues.
Dealing with multiple formats and systems can be a headache for anyone managing various projects. But here’s where Balena Etcher makes life easier by bridging the OS divide.
Simple and easy-to-use interface
I love how Balena Etcher makes creating bootable USB flash drives almost effortless. The interface is designed to be user-friendly, so you don’t need to be a tech whiz to navigate through the process.
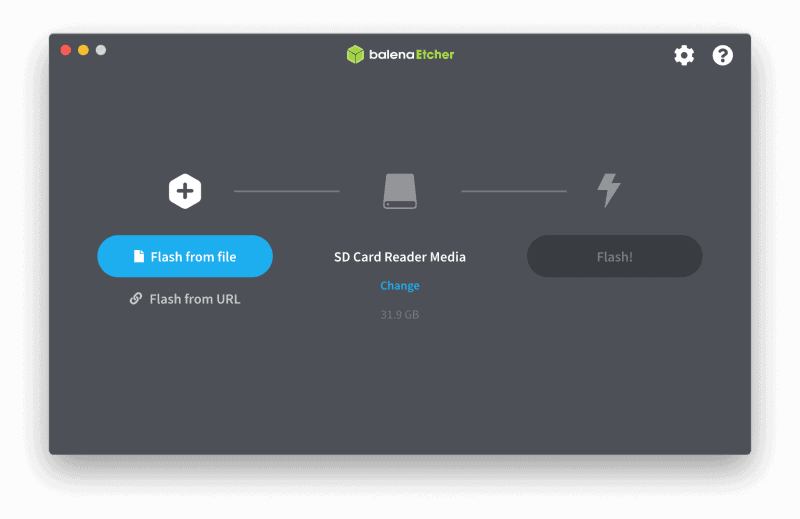
It’s all about dragging and dropping your image files right where they need to go. Once your .iso or .img file is ready, select it in Etcher, plug in your SD card or USB drive, and hit ‘Flash!’ – that’s all there is to it.
Balena Etcher also simplifies choosing multiple destinations for flashing images without complicating things. You’ll see clear progress indicators as the software writes the image files onto your chosen media.
And if you’re working with more than one USB drive or SD card, Etcher lets you line them up in one smooth operation.
How to Use Balena Etcher
With Balena Etcher, creating a bootable USB drive or SD card is straightforward and foolproof. Begin by downloading the software from the official Balena website or Bytesin; it’s compatible with Windows, macOS, and Linux operating systems.
Once installed on your computer, launch the program to access its clean and intuitive interface.
To flash an OS image onto your selected medium, follow these simple steps:
- Firstly, click “Flash from file” to select your desired image file—Etcher supports .iso, .img, and even zipped files.
- Next, insert the SD card or USB drive into your device and let Etcher automatically detect it; alternatively, press “Select target” to choose it manually if needed. Confirm that you’ve chosen the correct drive to avoid data loss—it’s critical to maintain data integrity.
- After verifying everything is in order, including checking that you have the right permissions set on your machine if necessary, click “Flash!” Sit back as Etcher takes care of the rest.
Here’s a good video explaining things more visually, if you will. As you can see, the process of using BalenaEtcher is pretty simple.
Step-by-step guide for flashing OS images onto SD cards or USB drives
Creating bootable SD cards and USB drives with Balena Etcher is straightforward. I’ve found it to be an incredibly reliable way to prepare portable storage devices for installing operating systems.
- First, I make sure to download Balena Etcher from the official website or from our own software directory. It’s essential to get it from a trusted source to ensure the software is safe and up-to-date.
- After downloading, I just run the installer on my computer, which is pretty quick and requires no technical skills – just a few clicks, and I’m done.
- Once installed, I launch Balena Etcher. The user interface is clean and intuitive, so there’s little chance of me getting lost here.
- Next, I click the “Flash from file” option and navigate through my files to select the OS image I want to use – .iso or .img files work perfectly here. You can also “Flash from URL”, which lets you choose the URL of an image file. I still prefer the file option, can’t risk my internet connection going down and ruining the whole thing.
- With the image selected, I click “Select target” to choose where I want this OS image to be written – either an SD card or USB drive connected to my computer.
- Before starting the flashing process, I double-checked to ensure that I had chosen the correct drive because this process will erase all existing data on it.
- Now comes the action part: hitting the “Flash!” button rapidly transfers the image onto my chosen media.
- While Etcher works its magic, a progress bar keeps me informed about how much longer it’ll take – usually just a matter of minutes, depending on the size of the image and speed of my drive.
- Once complete, Balena Etcher validates the flash to ensure everything is in order because nothing’s worse than discovering errors during installation.
- Finally, once flash verification is done, it safely unmounts the SD card or USB drive to remove it without any data corruption risks.
Balena Etcher stands out as a flagship app of image flashing, transforming the creation of bootable USB drives and SD cards into a simple task. This powerful software weaves simplicity with efficiency, ensuring that anyone can step confidently into the world of operating system installations.


")


