
ReShade is a software application that can truly take your gaming experience to the next level. With its customizable settings and wide range of effects, you can boost or enhance the graphics in your favorite games. If you have an old game that looks bad, try applying some ReShade shaders to it. You’ll be amazed by it’s power.
- Reshade is a software tool that enhances video game graphics. It lets you adjust frame color, depth info and use textures straight from the shader code in games.
- To install ReShade, download it from reshade.me, select your game’s .exe file during setup and choose the appropriate graphics API for maximum effect.
- You apply Reshade to a game by launching it, accessing the rendering API selection menu within Reshade, and picking a preset or creating custom effects.
- If you face issues like crashes or compatibility problems with games when using Reshade, ensure all your systems are up-to-date and be careful while installing DX9 games.
- Exploring additional customization options within ReShade, such as modifying preset effects, and adjusting vibrance levels can help gamers tailor their gaming visuals according to preference!
What is ReShade?
ReShade acts like a powerful tool for gamers. It gives us access to frame color and depth information and even allows us to use textures directly from the shader code in video games.
This means we can tweak and adjust game graphics to our liking.
In its default setting, ReShade includes only the depth buffer linked with a specific game. But it’s more than just a graphic enhancement tool; it provides detailed information about itself, its authorship, and related open-source libraries used.
Plus, there’s compatibility with SweetFX 2.0 that lets us add extra fine-tuning to our gaming experience!
ReShade Installation
To install ReShade, first download the installer from our site. Next, run the installer and, when prompted, select your game’s .exe file in the directory. Ensure you confirm by selecting the correct graphics API for your desired effects to perform optimally.
Let’s go through the exact steps to run the installer and select your game’s .exe file during the ReShade installation process.
- Once you downloaded the installer, launch the setup file on your computer.
- Select the game directory you’d like to apply ReShade to when prompted.
- Navigate to and choose the relevant game’s executable (.exe) file.
- Confirm your selection and continue with the prompts presented by the installer.
Confirming the installation by selecting the graphics API
Choosing the correct graphics API is essential in the ReShade installation process. The setup tool prompts us to make this selection, which is a key step toward confirming the successful installation of ReShade.
We must navigate through this stage carefully because selecting an incorrect graphics API could affect game performance or even result in software compatibility issues.
On top of that, during this procedure, users are also given options to overwrite or uninstall ReShade if required. It’s crucially important for us as gamers to know how to choose and understand why we’re choosing a specific graphics API for our games’ visual enhancement with ReShade.
Applying ReShade to a Game
Once you’ve installed ReShade, it’s time to bring your games to life. We’ll guide you step-by-step on how to apply Reshade, select the right rendering API, and customize effects for a more immersive gaming experience.
Launching the game and opening ReShade
Let’s get our game on with ReShade. Here are the steps to follow:
- First, make sure ReShade has been installed correctly; improper installation can lead to it not running.
- Next, launch your chosen game; opening the game is necessary for ReShade effects to take effect.
- Once the game is up and running, open ReShade.
- Navigate to the rendering API selection tab in the ReShade menu.
- Choose from a list of preset effects or feel free to customize your own.
- Don’t forget to test each effect for compatibility with OpenRails or other games; some might not load properly.
Selecting the rendering API
In the ReShade installation sequence, we arrive at a crucial step—choosing the rendering API. The game’s API is responsible for processing 3D graphics in real-time and different games use specific APIs such as DirectX or OpenGL.
Whether it’s DX11 or OpenGL, pick the correct one based on your game’s requirements. Did you accidentally install ReShade with the wrong settings? Don’t worry! Delete any previously installed files and reinstall using your game’s correct rendering engine option.
If dealing with persisting issues, checking your selected API often aids in troubleshooting compatibility problems while applying ReShade to a game.
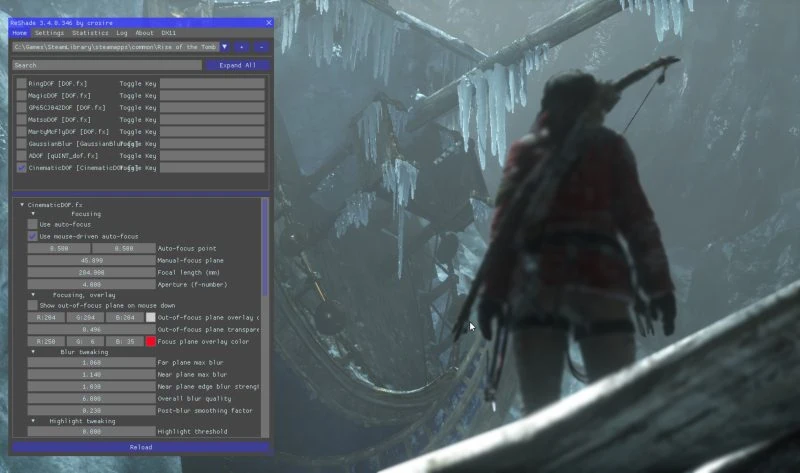
Configuring the desired effects and presets
Let’s take a deeper dive into how to configure the desired effects and presets with ReShade:
- First, we launch the game and activate ReShade by pressing the home key on our keyboard, unearthing various visual effects.
- We explore different tabs such as “Settings”, “Statistics”, and “About” to acquaint ourselves with various features present in this tool.
- We then click on the + button situated at the top of the ReShade interface, which prompts us to create a new preset, where we can input our preferred name.
- Afterward, we sift through numerous post-processing effects available on ReShade, like Colorfulness, Vibrance, or Clarity that enhance our game graphics.
- We select an effect and check its box to enable it; each effect with its customizable variables gives us robust control over modifying rendering.
- Changing these variables helps us adjust settings according to preference; for example, we can increase or decrease brightness levels until satisfied with the visuals.
- Once done altering settings for an effect, we collapse it by clicking on its name again, keeping the interface organized for swift navigation.
- We save changes made by clicking on ‘Performance Mode’ which effectively applies all settings to our game immediately.
- Advisably, creating backups of configured presets involves simply copying and pasting them elsewhere as files before making any further changes.
Additional customization options
- Modifying preset effects: Tweaking the preset effects can create a unique gaming experience tailored to your liking.
- Using depth buffer outputs: These provide advanced visual effects and offer more control over the in-game graphics.
- Adjusting vibrance levels: Enhancing vibrant colors can give an immersive, captivating view.
- Balancing light and shadows: This feature helps in creating more realistic or dramatic scenes by adjusting light and shadow intensity.
- Employing texture sharpening: For more crisp images, you can apply this tool to enhance fine details.
- Creating personal presets: The user-friendly interface allows you to save your favorite settings as presets for easier access later.
- Playing with color filters: Adjusting color tone and hue can drastically alter the game’s overall mood.
Troubleshooting
We all know that game crashes or compatibility issues can be frustrating, especially when you’re deep into ReShade’s customization. It’s also important to know how to remove ReShade from your game, in case things go wrong.
- Ensure your Steam Client is up-to-date if you’re playing Steam games. An outdated client may crash on startup with Reshade.
- Be aware of potential troubles with OpenGL games and programs, as Reshade may cause them to crash upon launch.
- If you have a DX9 game, install Reshade cautiously. It can trigger the failure of the game launch.
- For DirectX 9 games, expect possible compatibility issues with Reshade that might lead to crashes.
- If you’re an avid player of Dead by Daylight, refrain from using version 5.9.0 of Reshade, which is known to cause loading crashes.
- Check your Reshade presets regularly. User reports indicate issues such as non-functioning presets, crashes during Sims 4 playthroughs, or missing effect files in search paths.


")


