
Guest accounts can be found in most operating systems of the world, whether they are on the desktop or on mobile devices. Sometime in the summer, Microsoft seemingly removed the feature for Windows 10 PCs and left users stranded without so much as an explanation. However, there are still quite a few ways to enable guest accounts in Windows 10 even if Microsoft does not want you to.
Guest accounts in Windows
Even if you have never used the guest account feature in Windows, there is a pretty good chance that you might want to. Guests have highly restricted accounts so they cannot install software, change system settings, alter your hardware, configure drivers, create passwords or pretty much anything else that can affect your PC. And in addition to all that, they have no access to your own personal files, passwords, and settings so you can rest easy while someone else is browsing your computer. All of the above are highly useful even when one of your friends needs to use your computer because they cannot affect anything. For instance, they can easily visit social networks, email clients, and other sensitive services without having to log you out first.
The Windows 10 Bug
In some Windows 10 computers, the guest account can technically be enabled but not without running into a horrendous bug. Even though everything initially appears normal, logging into the guest account after enabling it for the first time may cause the screen to constantly flicker/flash and Windows Explorer to crash repeatedly. There is no fix for this, and it might be one of the reasons why Microsoft decided to disable the guest account feature.
If this happens to you, skip ahead to Method X as that might be the only way you can get a guest account working in your computer.
Method 1: Computer Management
This option may not be available if you are running a Windows 10 Home PC though results may vary.
- Right-click on your Start menu’s icon and select the “Computer Management” option.
- Expand the “System Tools” menu on the left-side panel.
- You should now see another menu named “Local Users and Groups”. Click on that menu and open the Users folder.
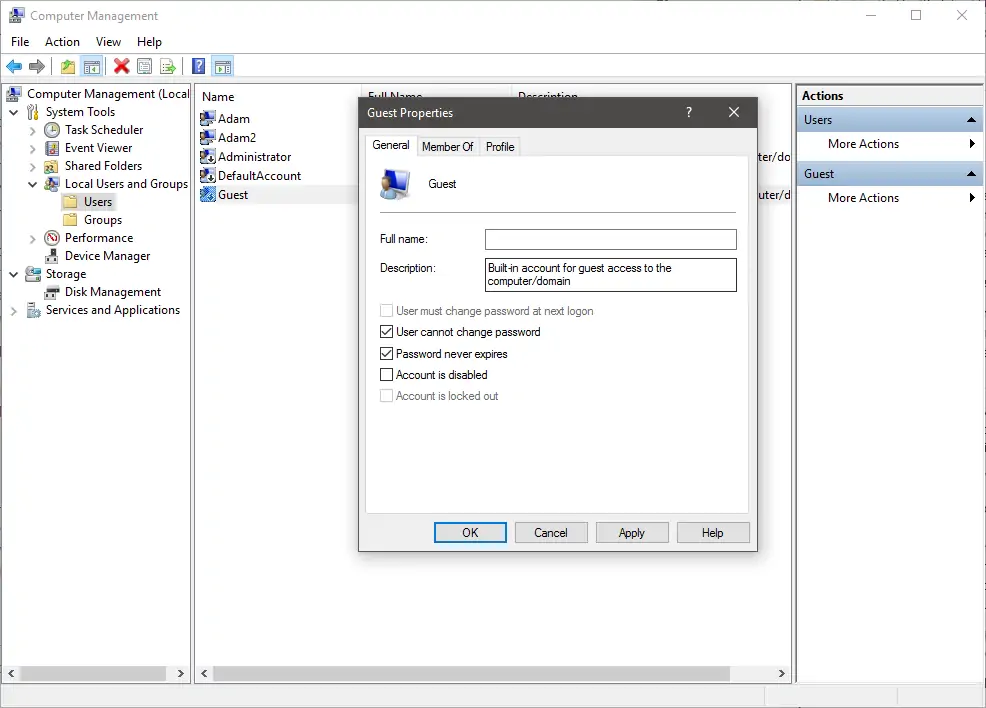
- Find the account called “Guest” and double-click on it to open its Properties.
- Uncheck the box that reads “Account is disabled” and click on OK to save your settings and close the properties window. Feel free to also close Computer Management as it is no longer necessary.
Method 2: Command Prompt
Adding a guest account through CMD is surprisingly easy so do not be intimidated by the utility.

- Open your Start menu, type exe and press Ctrl + Shift + Enter. This will automatically open an elevated command prompt window, which means you will be running it with administrative privileges. Alternatively, you can right-click on the CMD result and select to “Run as administrator”.
- In the command prompt window, type net user guest /active:yes and press Enter.
- If you see a message saying that the command was completed successfully then you can close CMD. Otherwise, make sure that you have entered the command correctly by trying again.
- To disable the account, run the exact same command and replace yes with no.
Method 3: Local Group Policy Editor
This method is only available in Pro and higher editions of Windows 10 as Microsoft does not include the Local Group Policy Editor in Home versions of Windows.
- Open your Start menu, type msc and press Enter.
- Navigate to Computer Configuration > Security Settings > Local Policies > Security Options.
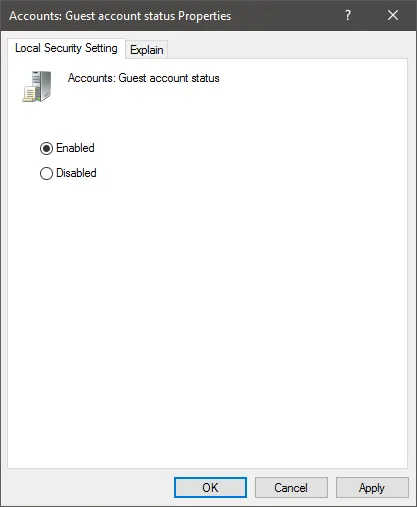
- Double-click on the “Accounts: Guest account status” policy.
- Change the status to “Enabled” and click on OK to close the window and save your settings.
- Before closing the window, you might also want to change the name of the Guest account via the “Accounts: Rename guest account” policy.
Method 4: The “fake” Guest account
If all of the above methods fail, there is one other thing you can do and that is to create a standard user account that you will use only for guests. We have talked extensively about managing your accounts in Windows 10 but the gist of it is that you can create a new account by going to Settings > Accounts> Family & other users. Select the “Add someone else to this PC” option and make sure that you do not enter an email address so that the new account can be marked as a local one. Note: You cannot name the account as “Guest”. If you attempt to do it, Windows will simply ask you to choose another name.
When you are done, there is still one thing you can try in order to turn this account into a real Guest account.
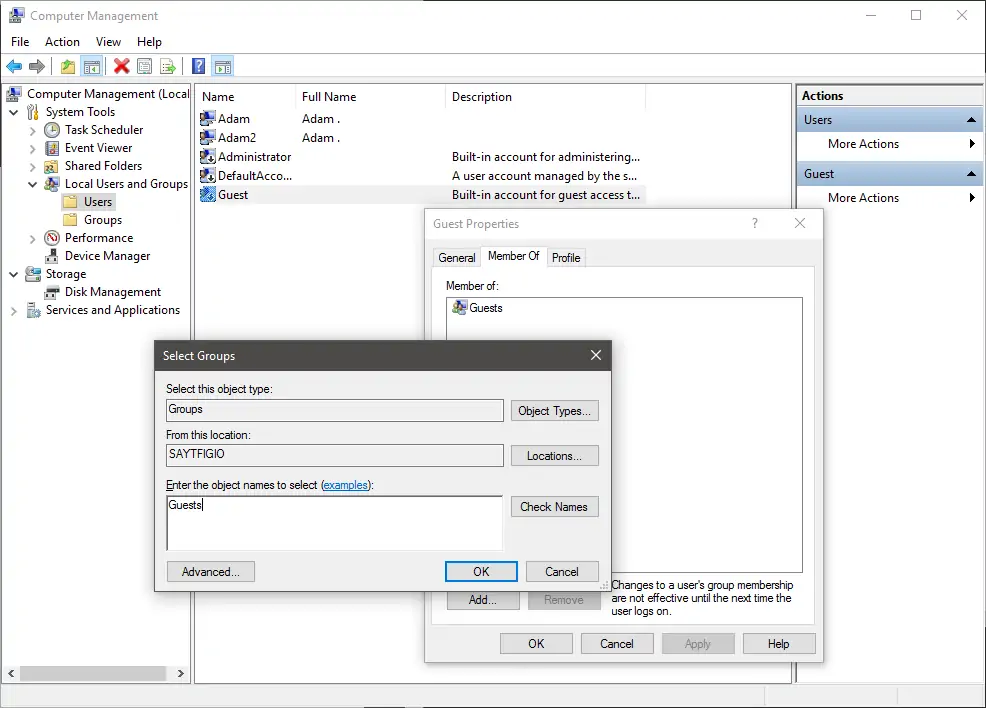
- Start by opening Computer Management and going to the same Users folder we talked about in Method 1.
- Now, double-click on your newly created account and go to the “Member Of” tab.
- Click on the “Add” button, type Guests in the box and click on OK.
- If everything went right, your new account should now be attributed as a Guest.
Getting your old files back
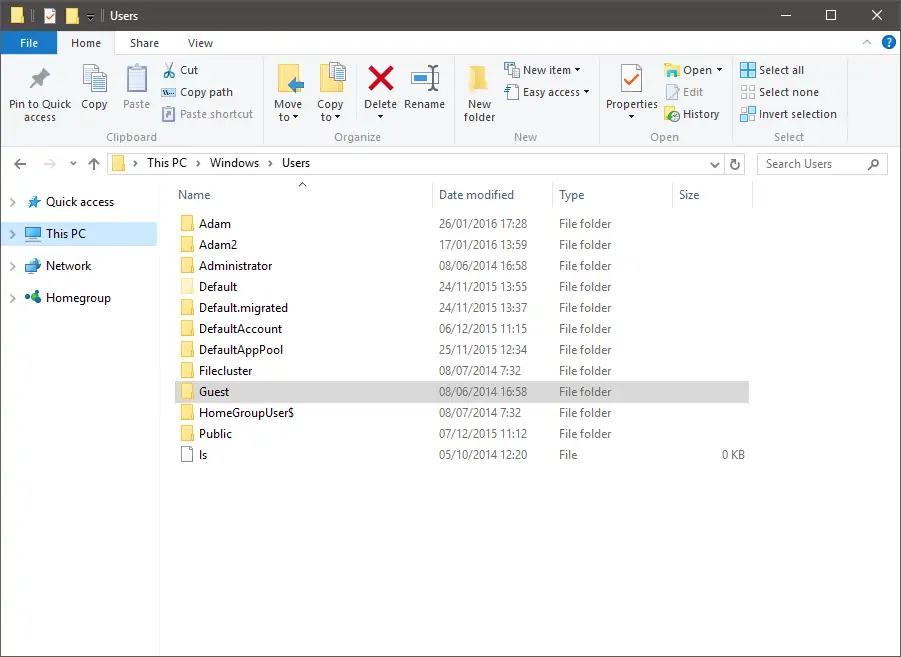
If you upgraded to Windows 10 from a previous version of Windows, you might have had a few files and folders in the old guest account that you do not want to lose. In case you upgraded recently, you might be able to find the files by going to “C:\Windows.old\Users\Guest” or just “C:\Users\Guest”. After you find the correct folder, just copy and paste your old files to your new Guest account or wherever else you please.


")


