
High disk usage is a long time issue for Windows users and it looks like the problem persists in Windows 10 as well. It’s very often that if your computer is having 100% disk usage the process
How to fix 100% disk usage in Windows 10
So far, Microsoft hasn’t been able to come up with a solution but it doesn’t mean there’s nothing you can do. We’ll show you what you can do to fix 100% disk usage in Windows 10, but first let’s see what’s the deal with the “wsappx” process.
What is Wsappx?
Wsappx is a process which you can see in the Windows Task Manager and was designed to handle Windows Store (Microsoft Store) apps for Windows 8 and Windows 10. In other words, this process will handle the installation, uninstallation, and updates for Windows Store apps.
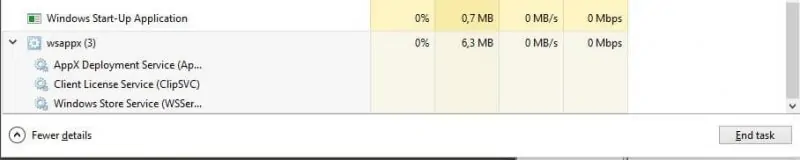
Wsappx comprises two background services, specifically the AppX Deployment Service (AppXSVC), and Client License Service (ClipSVC). The first one offers infrastructure support for the deployment of Store apps. The Client License Service (ClipSVC) is responsible for Microsoft Store’s infrastructure.
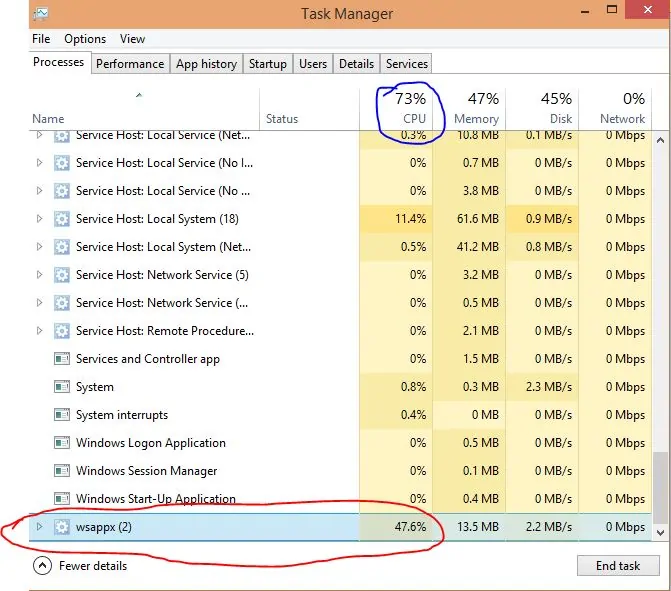
In most cases, Wsappx can be easily noticed in Task Manager as the main factor regarding high disk usage. However, it can also be listed under processes with different names, so here’s how you can check if Wsappx is the main issue for high disk usage in your case.
Don’t miss: Clear the Store cache in Windows 10
Open Task Manager, right-click on the process that is using the largest chunk of the disk and select “Go to details”. This will show all the processes involved and you can see if wsappx is there or not.
Why does Wsappx cause high disk usage?
Windows Store apps receive updates on a regular basis. Normally, that wouldn’t be an issue but it can happen that some of these operations become stuck and the operating system will continue to attempt performing them in the next session which could cause 100% disk usage.
Some people think
Don’t miss: Re-register Windows Store apps
How to disable Wsappx
There’s more than one way to disable the Wsappx process and we’ll show you two since it seems different users are having success using different methods.
1. Disable Windows Store
This method will come with various consequences. First of all, you won’t be able to use Windows Store and you might experience bugs and lag in Windows Store apps.
Before getting started, keep in mind that disabling Windows Store will not disable the Wsappx process. However, it will limit resource usage for performing Windows Store-related tasks so the 100% high disk usage problem will definitely go away.
Don’t miss: Sideload apps on Windows 10
Disable Windows Store from the Registry Editor
Open up the Registry Editor (type ‘regedit’ without quotes in the Start search and click the first result).
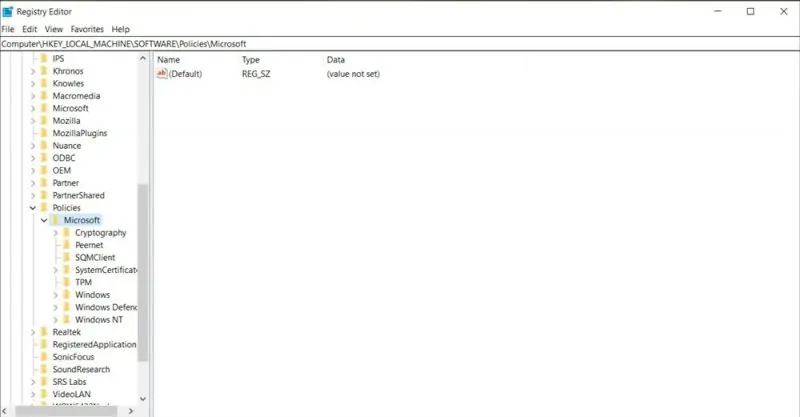
Go to ‘HKEY_LOCAL_MACHINE\SOFTWARE\Policies\Microsoft‘. You can just copy paste the address without quotes in the Registry search bar at the top of the window.
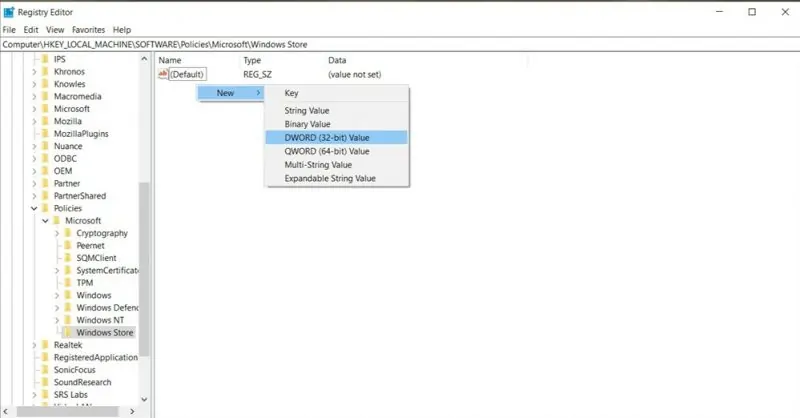
Select the Windows Store folder and right-click in the right panel. From the context menu select New -> DWord (32-bit) Value.
Note: If you don’t have the Windows Store folder you will need to create one. To do that,

Rename the DWORD value as “RemoveWindowsStore”. Set its value to ‘1’. Reboot your PC to apply the changes.
Disable Windows Store via the Group Policy Editor
Windows Pro and Enterprise users can also disable the Windows Store via the Local Group Policy Editor. Go to Computer Configuration -> Administrative Templates -> Windows Components -> Store.
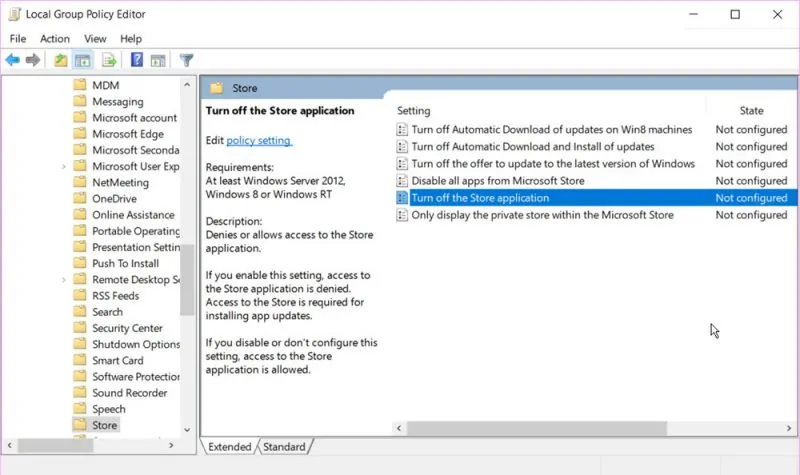
Double-click the “Turn off the Store application” setting in the right panel. Select Enabled and click the Apply button. Reboot your computer.
2. Disable Clipsvc and AppXSvc
Type ‘regedit’ without quotes in the Start search and hit Enter on your keyboard. In the Registry Editor go to ‘HKEY_LOCAL_MACHINE\SYSTEM\ControlSet001\Services\AppXSvc‘ (you can just copy paste this address in the Registry search bar).
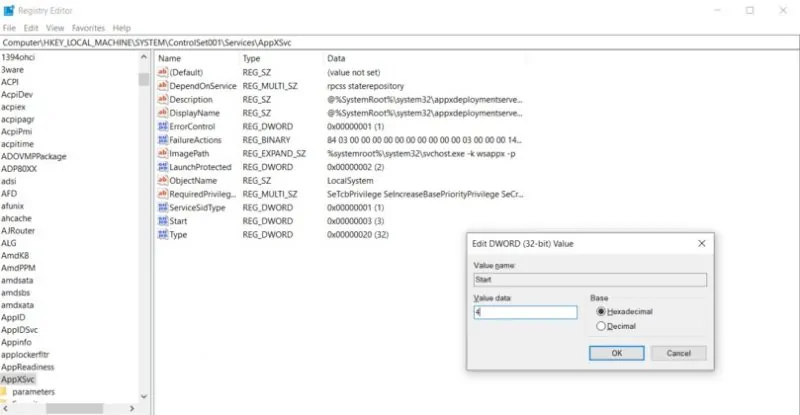
In the right panel, open the Start file and change its value from ‘3’ to ‘4’ then restart your PC.
To disable ClipSVC you will need to repeat the steps above once you navigate to
‘HKEY_LOCAL_MACHINE\SYSTEM\ControlSet001\Services\Clipsvc‘.


")


