
Discord is an instant messaging and communication app widely used by gamers, as well as other communities. Despite the efficiency, one function that Discord does not currently offer is recording audio from the communication done through it. But this can be fixed with the help of third-party software.
Discord is a very impressive tool for many. But if you need to playback a stream or listen to previous conversations, recorded audio files might come in handy.
Before going further, be sure that everyone who will be involved in the recording is aware and has agreed to have them included. In some countries, recording audio without permission is deemed illegal.
Here are two ways to easily record Discord Audio
Using Craig ChatBot for Recording Discord Audio
If you have set up your own Discord server, you can use the Craig ChatBot to easily record audio. It conveniently records each user as a separate audio track. It makes it much easier to get excerpts, adjust levels, or remove parts when needed.
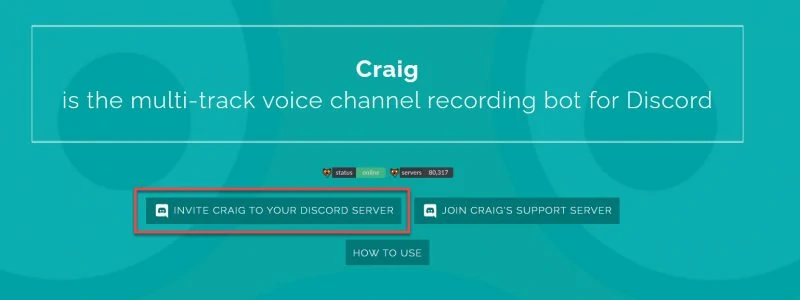
To have the Craig ChatBot, you can easily invite it to your server through Craig’s website. Just select “Invite Craig to Your Discord Server”, and an authorization page will appear. Simply select your server from the “Add Bot To” list then click “Authorize” to give permission for the bot to be in your server.
Afterward, you should see a join notification from Craig on your server. With this, you can now use the bot to record your audio with just a few text commands.
Once the chatbot is added to your server, you can invite it to chat rooms, input some text commands and it will then start recording.
First, enter an audio channel and type :craig:, join . You’ll hear an audio notification from the bot saying “Now Recording”.
For the recording to stop, just type in :craig:, leave
You can also use a command to let Craig join or leave a specific channel. For example, you want it to start or stop recording audio from the “General” channel, type :craig:, join General or :craig:, stop General .
To stop recording from all channels, you can type :craig:, stop , which will force Craig to end all recordings at once.
The Craig ChatBot will send you a private message for the links where you can download or delete your recordings. You can download the recorded audio in a variety of modern audio formats, including FLAC, MPEG-4 AAC, and more.
Using OBS for Recording Discord Audio
Using OBS or an Open Broadcaster Software to record Discord communications is a good option if you don’t own a Discord server or you are not in charge of one.
OBS is an open-source streaming tool and is free to use on Windows, MAC, and IOS. You can easily use it to broadcast your Discord audio on Twitch, Youtube, and other video streaming platforms. To do this, you will need to allow OBS to capture your audio from your desktop as well as your own microphone.
See also: How to personalize your Discord account
Setting up OBS to Capture Audio
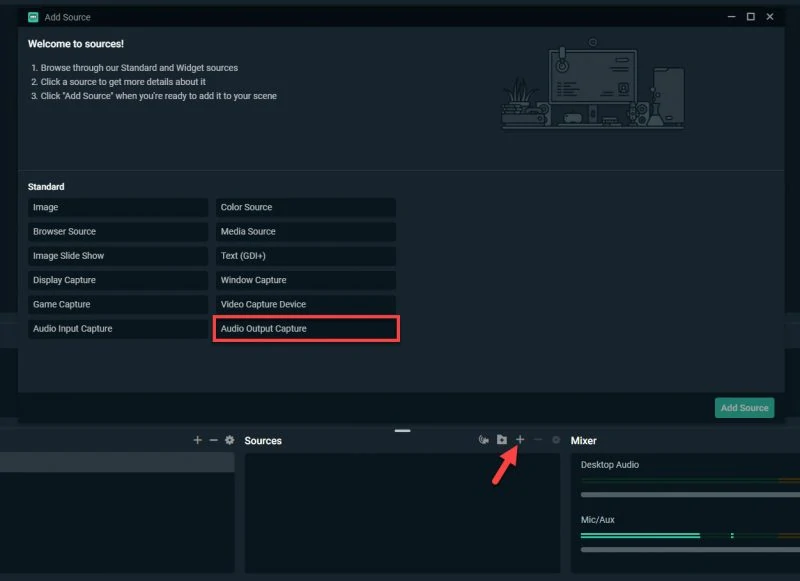
First, set your OBS up to capture audio from the sources you prefer. Click the plus icon (+) in the area labeled as “Source” and select “Audio Output Capture” for the dropdown menu. A “Create/Select Source” menu will pop-up which will require you to provide a name for your desktop audio source then proceed by clicking “OK”.
You will also need to select your output device from the “Properties” menu, choosing your speakers or headphones from the “Device” drop-down menu. Click “OK” to confirm and save these settings.
Check if you have set things up properly by playing audio on your PC and see if OBS is capturing it.
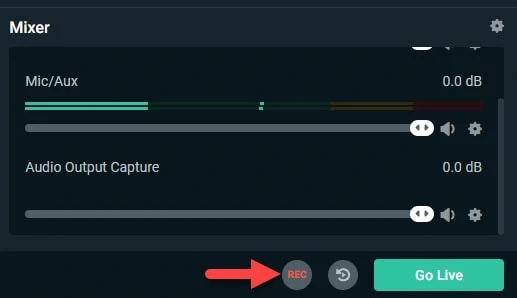
On the “Audio Mixer” section, see if the sliders for “Audio Output Capture” are moving. If it does, it can pick-up your desktop audio and is ready for recording. In the same area, you can also find a couple more sliders that can help you boost the quality of the audio you are capturing or recording.
The blue sliders underneath the ones for “Audio Output Capture” are for adjusting volumes if ever you might need to do so.
There are also sliders as indicators and for volume adjustments dedicated for your own microphone usually with a default label “Mic/Aux”. If you don’t see anything as such, you will need to add your microphone as a device from the “Audio Input Capture” by clicking the plus icon (+) in the “Sources” area. This is to record your own audio along with the Discord audio from your desktop.
Use these sliders to ensure that your Discord audio, you and your game, or whatever it is you are streaming are in balanced volumes so the audio can be captured and recorded smoothly and clearly.
Start Recording Discord Audio with OBS
When everything is set, look for the “Controls Section” on the bottom-right area of the OBS window. There, you will find a “Start Recording” button that you can click when you’re ready.
You can also record a sample audio first before the actual Discord communication take place to ensure that everything will run smoothly.
To find all your recordings, go to File on then OBS menu then click “Show Recordings”. Your files will be saved with a file name from the time and date to when the file was created. OBS saves recordings as a (blank) video file in MKV format. But you can modify this by going to Settings> Output and then select an alternative file format from the “Recording Format” drop-down menu.
If you want your recording to be an audio-only file, you can also opt for converting it from MKV to MP3, making it much easier for you to export and use it for other functions.
There is plenty more software out there that you use to record Discord audio. However, some software like Audacity only records from a single input. If you use this, your voice will not be recorded so you have to watch out for such limitations if you choose to use any other software.
Whatever you choose, be sure to configure the audio output for your desktop as well as your input device for Discord such as your microphone. Setting this all up properly will make recording a breeze for you.


")


