
Are you looking to add some creativity to your videos? Using the green screen effect can help you achieve the desired effect. CapCut is a versatile video editing software with built-in chroma key functionality to help you use green screen technology. In this article, we will guide you on how to use a green screen on CapCut.
The first step in your endeavor is understanding what a green screen does and how to use it effectively. Some key steps involved are starting a new project, importing green screen videos, working with overlays, using the chroma key feature, adjusting intensity and effects, fine-tuning your video, adding and editing layers, changing the background, and exporting your project. We will provide a step-by-step guide to help you use the green screen on CapCut effectively, along with an example at the end.
Key Takeaways
- Understanding green screen and CapCut functionality is essential to using the effects.
- Using green screen on CapCut involves several steps, including starting a new project, importing green screen videos, and adjusting intensity and effects.
- With the help of this article, you can use green screen on CapCut to add more creativity to your videos.
The Green Screen Effect
If you’re a content creator looking to add some visual flair to your videos, using a green screen can be an awesome idea. Green screens allow you to remove the background of a video and replace it with something else, like a different image or video. CapCut, a popular mobile video editor, offers built-in green screen functionality that makes it easy to create these effects.
A green screen uses a bright green background that can be easily removed in post-production. When filming, you’ll want to ensure that the green screen is evenly lit and that there are no shadows or wrinkles. This will help ensure that the background can be easily removed in editing. Once you have your footage, you can use CapCut’s chroma key functionality to remove the green screen and replace it with something else.
CapCut’s green screen functionality is easy to use and can be accessed through the app’s Overlay feature. Simply select the video clip with the green screen and add it as an overlay. You can use the chroma key settings to adjust the key color and remove the green screen from there. CapCut also offers other tools and effects that can be used to enhance your green screen footage further.
Using a green screen in CapCut can be a great way to add creativity and production value to your videos. The app’s built-in functionality makes it easy to get started and create professional-looking effects.
Starting a New Project
When you open CapCut, the first thing you need to do is start a new project. This can be done on both PC and mobile devices, including iOS and Android.
To start a new project on CapCut, click on the “New Project” button located on the home screen. From there, you can select the aspect ratio and resolution you want to work with. CapCut offers a wide range of aspect ratios, including 16:9, 9:16, 1:1, and more, so you can choose the one that best suits your needs.
If you’re using CapCut on a PC or Mac, you’ll need to download and install the software first. Once you’ve installed it, open the program and click the “New Project” button to start.
Once you’ve started a new project, you can import your footage into CapCut. This can be done by clicking the “Import” button and selecting the files you want to use. CapCut supports a wide range of file formats, including MP4, AVI, MOV, and more, so you can use almost any type of footage you have.
If you’re using CapCut on a mobile device, you can also import footage directly from your camera roll. Simply click the “Import” button and select the footage you want to use.
Importing Green Screen Videos
To import green screen videos into CapCut, we must first have the video file saved in the right format. CapCut supports several video formats, including MOV and AVI. If your video is not in the correct format, you can use a video converter tool or an online converter.
Once you have the video file in the correct format, you can import it into CapCut. To import a green screen video from your camera roll, tap the “Import” button on the home screen of CapCut. From there, you can select the video from your camera roll and import it into CapCut.
If you don’t have a green screen video of your own, you can find free green screen videos on sites like Pixabay and Pexels. To import a green screen video from one of these sites, simply download the video and save it to your camera roll. Then, follow the same steps as above to import it into CapCut.
Another option is to use a green screen meme or image. To do this, find a green screen meme or image online and save it to your camera roll. Then, follow the same steps as above to import it into CapCut.
In summary, to import a green screen video into CapCut, we need to have the video saved in the correct format. We can import videos from our camera roll or download them from sites like Pixabay and Pexels. We can also use green screen memes or images.
Working with Overlays
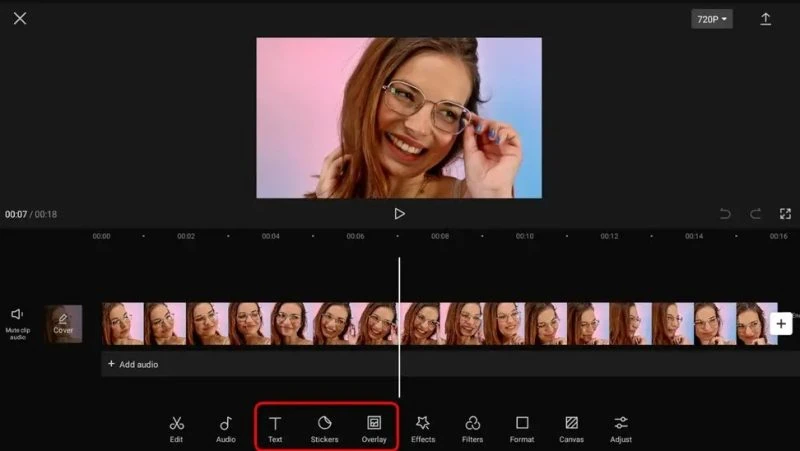
When it comes to adding overlays to your CapCut project, the process is straightforward to follow. Overlays can be used to add visual effects, text, or even green screen overlays to your video.
To add an overlay to your CapCut project, click on the “Overlay” button at the bottom of the screen. From there, you can add an overlay from your camera roll or select one of the pre-installed overlays.
If you want to add a green screen overlay to your video, you will first need to obtain one and have it ready in your camera roll. You can find green screen videos online or do a YouTube/Google search for “popular green screens” or anything more specific that you’re looking for.
Once your green screen overlay is ready, you can add it to your CapCut project as an overlay. Click “Overlay” at the bottom of the screen and tap “Add overlay.” From there, select your green screen overlay from your camera roll and adjust its position and size as needed.
Whether you’re adding text, visual effects, or green screen overlays, the process is quick and easy to follow. So go ahead and experiment with different overlays to make your video stand out!
Using Chroma Key Feature
We can use the Chroma Key feature in CapCut to remove the green screen background and replace it with another image or video. This feature is useful when we want to superimpose a subject onto a different background or create special effects.
We need to have a green screen video in our gallery to use Chroma Key. If we don’t have one, we can download it from free stock video websites like Pixabay or Pexels. Alternatively, we can use the screen recorder to record a green screen video.
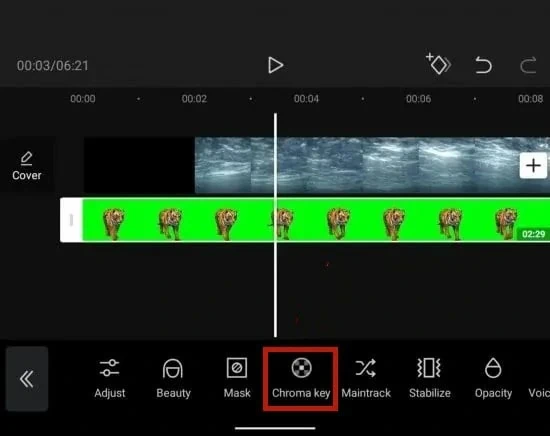
Once we have the green screen video, we can add it to the timeline and select it. Then, we can click on the “Cutout” button at the top right-hand side of the screen. This will bring up the Cutout menu, where we can select the “Chroma Key” option.
We can adjust the settings to remove the green background in the Chroma Key menu. Use the color picker tool to select the exact shade of green in the video, or you can use the sliders to adjust the chroma and similarity levels. We can also preview the changes in real time by clicking the “Preview” button.
Once satisfied with the Chroma Key settings, we can click the “Apply” button to remove the green background. We can then add a new image or video to the timeline and position it behind the subject. We can also use the “Blend” option to adjust the opacity and blending mode of the subject and the background.
The Chroma Key feature in CapCut is a powerful tool for removing backgrounds and creating special effects. With a little practice, we can use it to create professional-looking videos that stand out from the crowd.
Adjusting Intensity and Effects
Once you have added the green screen effect to your video, you can adjust the intensity and add additional effects to make your video more visually appealing.
Adjusting Intensity
To adjust the intensity of the green screen effect, tap on the green screen clip in the timeline. You will see a menu with several options, including “Intensity.” Adjusting the intensity allows you to control how much of the green screen is removed from your video.
Adding Effects
In addition to adjusting the intensity of the green screen effect, you can add additional effects to your video. CapCut offers a wide range of filters, transitions, visual effects, and more that you can use to enhance your video.
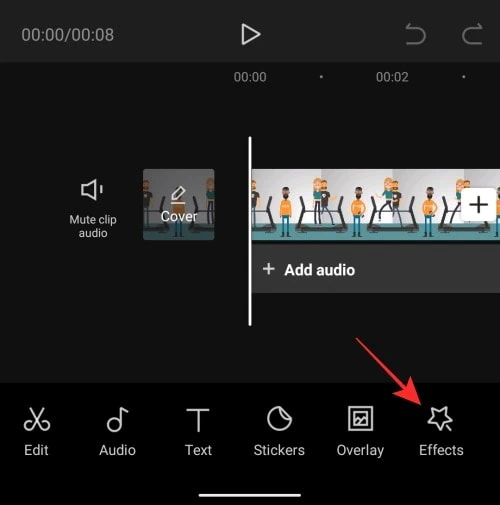
To add additional effects, tap on the clip in the timeline to which you want to add effects. Then, tap on the “Effects” button at the bottom of the screen. Here, you can choose from various filters, transitions, and visual effects to add to your video.
Green Screen Effects
CapCut also offers a variety of green screen effects that you can use to enhance your video. These effects include animations, additional effects, and more.
To add green screen effects, tap on the green screen clip in the timeline. Then, tap on the “Green Screen Effects” button at the bottom of the screen. Here, you can choose from various effects to add to your video.
Overall, adjusting the intensity and adding effects to your green screen video can help make your video more visually appealing. With CapCut’s wide range of filters, transitions, visual effects, and green screen effects, you can create a truly unique and engaging video.
Fine-Tuning Your Video
Once you’ve added your green screen effect to your video in CapCut, you may want to fine-tune it to make it look even better. Here are some tips to help you get the most out of your video.
Timeline
The timeline is where you can see the different clips you have added to your video. You can move the clips around by dragging them to different positions on the timeline. You can also adjust the length of the clips by dragging the edges of the clip. This is useful to ensure your green screen effect is perfectly timed with the rest of your video.
Playback Frame
The playback frame is the frame that is currently being displayed in the preview window. You can move the playback frame by dragging the slider at the bottom of the preview window. This is useful if you want to see how your green screen effect looks at a specific point in your video.
Zoom In
You can zoom in on your video by using the pinch-to-zoom gesture on your device. This is useful if you want to get a closer look at your green screen effect or to make sure everything looks perfect.
Velocity Edit
You can adjust the speed of your video by using the velocity edit feature. This is useful to speed up or slow down your green screen effect for a specific part of your video.
These tips should help you fine-tune your video and ensure your green screen effect looks great. With a little practice, you’ll be able to create professional-quality videos in no time.
Adding and Editing Layers
To add a layer in CapCut, we simply need to tap the “Layer” icon at the bottom of the screen. We can then choose the type of layer we want to add, such as a video or a photo. Once we have selected the layer, we can drag and drop it to the timeline and adjust its position as needed.
When working with green screen effects, it’s important to ensure the subject is positioned correctly in the frame. We can use the “Transform” tool to adjust the size and position of the layer, as well as rotate it if needed. We can also use the “Mask” tool to refine the subject’s edges and ensure that the green screen effect looks seamless.
In addition to adding layers, CapCut also allows us to edit them in various ways. For example, we can add stickers or text overlays to our green screen footage to make it more engaging. We can also apply filters or adjust the color and brightness of the layer to match the rest of our video.
If we want to add a watermark to our video, we can add a text layer and type in our desired watermark text. We can then adjust the text’s font, size, and color to make it stand out or blend in with the rest of the video.
Changing the Background
To change the background of your video using CapCut’s green screen feature, follow these simple steps:
- First, import the footage with the green screen effect and the new background you want to use. You can either use a solid color or an image as your new background.
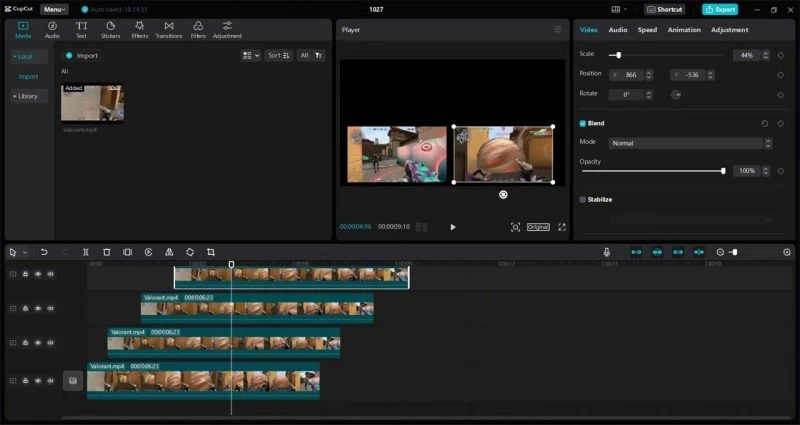
- Once you have imported your footage, drag your green screen footage to the timeline and place it on the top layer. Then, drag your new background footage to the timeline and place it on the layer below the green screen footage.
- Next, click on the green screen footage to select it, and then click on the “Overlay” button at the bottom of the screen. This will bring up the overlay menu.
- In the overlay menu, click on “Chroma Key” and then select the color of your green screen. CapCut will automatically remove the green screen from your footage and replace it with transparency.
- Finally, adjust the position and size of your new background footage as needed to fit your video.
And that’s it! With just a few simple steps, you can easily change the background of your video using CapCut’s green screen feature.
Exporting Your Project
Once you have completed your project, it’s time to export it and share it with the world. CapCut offers a simple and easy-to-use export feature, allowing you to export your project in just a few clicks.
To export your project, simply tap on the export icon in the screen’s top right corner. From there, you can choose your exported video’s size, resolution, and quality. CapCut offers a variety of options to ensure your video is exported in the best possible quality.
When exporting your project, it’s important to consider the intended use of the video. If you plan to share it on social media, you may want to choose a smaller size and lower resolution to ensure faster upload times. On the other hand, if you’re creating a video for professional use, you may want to choose a larger size and higher resolution for a more professional-looking video.
CapCut also offers a variety of video production options, including adding watermarks, subtitles, and music. You can customize these options to create a video that meets your specific needs.
Overall, exporting your project in CapCut is a simple process. With various options available, you can ensure your video is exported in the best possible quality for its intended use.
Step-by-Step Example
If you want to add some extra elements to your videos, using green screen effects can be a great way to make your content stand out. With CapCut, it’s easy to create professional-looking videos with green screen effects that can transport your viewers to any location.
Here’s a step-by-step example guide on how to use the green screen on CapCut:
- Record your green screen footage: The first step in using the green screen on CapCut is to record your footage against a green background. Make sure the green background is evenly lit and free from shadows or wrinkles for the best results.
- Import your footage into CapCut: Once you have your footage, open CapCut and create a new project. Then, import your green screen footage into the app.
- Add your background clip: Select the background clip you want to use and add it to your project. You can choose from various backgrounds, including images, videos, and even other green-screen footage.
- Overlay your green screen footage: Once you have your background clip, it’s time to add your green screen footage as an overlay. Click on “Overlay” at the bottom of the screen and tap “Add overlay.” Then, select your green screen footage from your media library.
- Adjust your green screen settings: CapCut offers a range of green screen settings that can help you fine-tune your footage. Use the Chroma Key tool to adjust the color of your green screen, or use the Mask tool to refine your edges and remove any unwanted artifacts.
- Export your finished video: Once you’re happy with your green screen effect, it’s time to export your finished video. Click on “Export” at the bottom of the screen and select your preferred export settings. Then, sit back and wait for CapCut to work its magic!
Common Issues
When using a green screen on CapCut, there are some common issues that you may encounter. Here are some troubleshooting tips to help you fix these issues:
Lighting
One of the most important factors when using green screen is lighting. If the lighting is not right, it can result in a poorly keyed video. To avoid this, ensure the lighting is even and consistent across the green screen. Avoid having shadows on the green screen, as this can cause issues with the keying process.
Shadow
If there are shadows on the green screen, it can cause issues with the keying process. To avoid this, ensure the lighting is even and consistent across the green screen. You can also try moving the subject away from the green screen to reduce shadows.
Pixelated
If your green screen footage appears pixelated, it could be due to a low-quality video or incorrect export settings. To avoid this, make sure that your video is of high quality and that you are exporting it at the correct settings. You can also try using a higher resolution video for your green screen footage.
Spill Suppression
When using green screen, spill suppression is important to avoid any green color bleeding onto the subject. If you are experiencing issues with spill suppression, try adjusting the settings in CapCut to reduce the amount of green spill. You can also try using a different green screen material or adjusting the lighting to reduce any green spill.
Enjoy creating your best videos on CapCut!


")


